Showing posts with label sewing pattern. Show all posts

Friday, October 17, 2014

Pocket Perfect! - Tutorial on Inseam Pockets for Trousers or Shorts

For my next trick I will perform a beautifully sewn pocket for a pair of shorts! I recently went through the task of making three pairs of shorts for a client and thought I would share with you my method of creating the inseam pocket. I'm assuming that you already have a pattern for the pocket and I'm just taking you through the sewing steps. If you would like a tutorial on how to make a pattern for this type of pocket just shout and one may be provided!

MATERIALS NEEDED:

- Fabric and shorts/trouser pattern
- Lining
- Scissors
- Sewing machine
- Pins

TUTORIAL

1. Grab all your pattern pieces for the shorts as we are about to begin! So you should have a pocket lining (lining fabric), a pocket backing (lining fabric) and a facing (fashion fabric), like so:


2. To make the pocket nice and neat and professional finished which is what we all want we need to finish the edge of the facing. You only need to do the edge of the facing that will be inside the pocket so don't bother with the side seam edge or top or bottom. I use a serger to finish the edge but you can use a zigzag stitch on a normal sewing machine.


3. Pin the beautifully neat facing to the pocket lining along the side seam edge of the pocket lining and sew in place with a normal straight stitch.


4. Next on the agenda is attaching the pocket backing to the front of your garment of choice. Pin the two straight edges right sides together and sew with a plain old regular straight stitch.


5. To make a lovely crisp edge for the pocket understitching is the thing to do. So first you'll need to finish the raw edge with either a serger or zigzag stitch. Then iron the seam flat so you have a nice edge to work with then to the sewing machine once more.


From the wrong side of the fabric sew the finished raw edge to the backing lining. This can be quite tricky so go slowly.


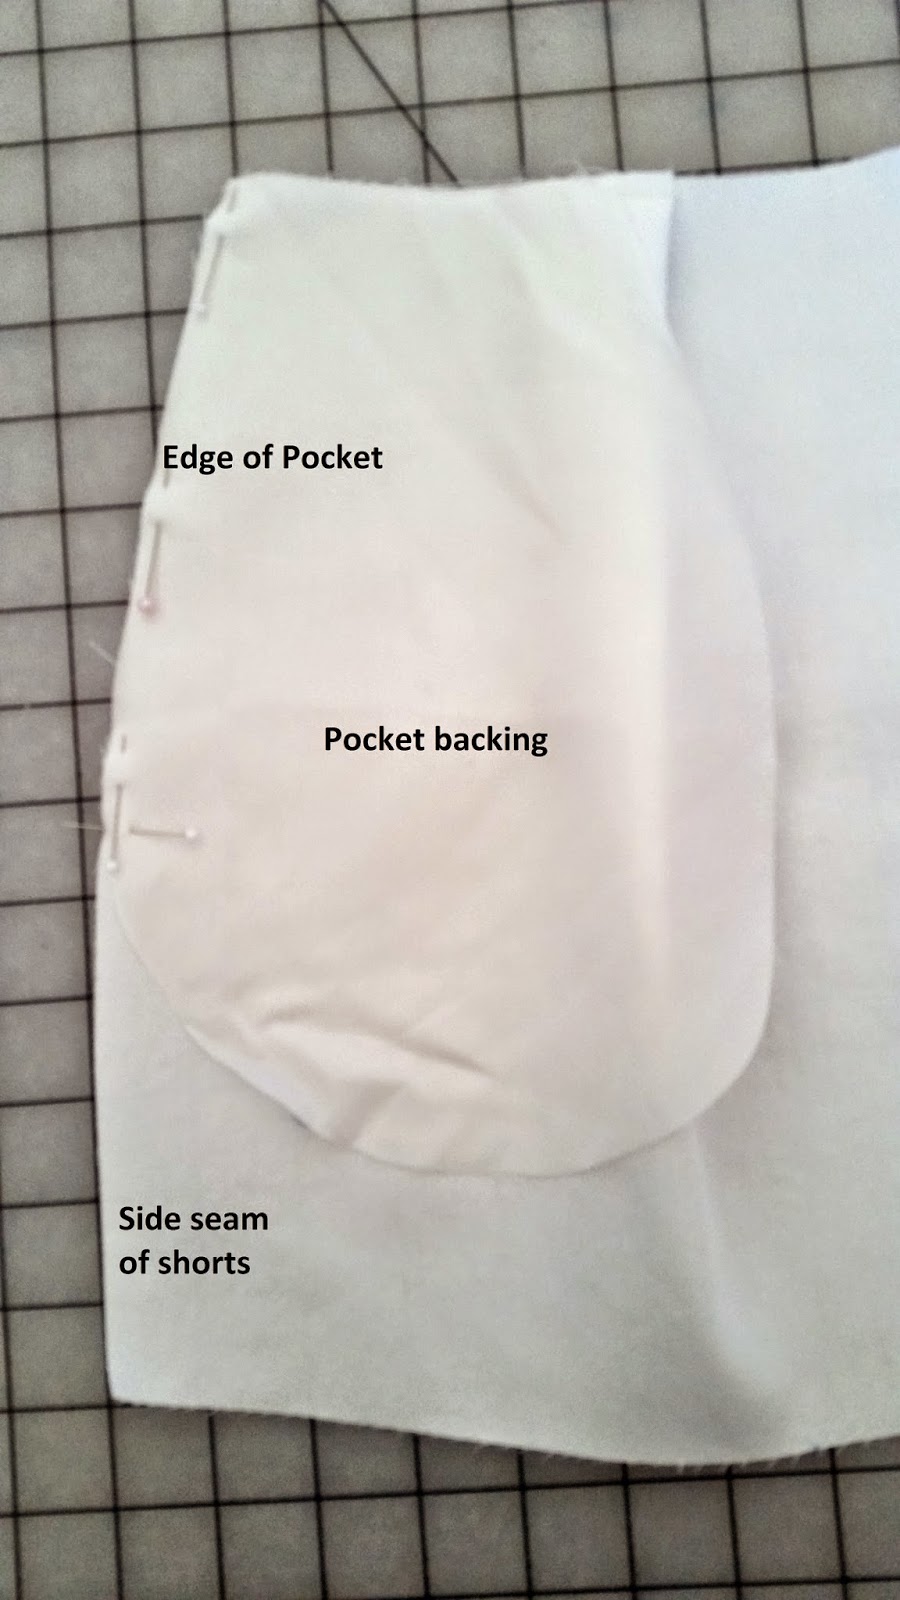
6. Now the pocket backing will meet its friend for life the pocket lining with attached facing! Mark on the pocket lining where the edge of the pocket will go to, I do this with a pin but you can use chalk or anything that marks.


Match up the pocket backing and lining and pin around the edge. Don't worry if its not an exact match as you can trim around the edges later. Make sure that the pocket backing is lying flat and is in the correct position on the lining.


7. Sew the pocket lining and pocket back together around the edge using a long basting stitch. Once sew together double check to make sure everything is lined up properly by folding the pocket over to to the wrong side of the short front. You should have a small triangle of the facing showing.


8. Easy step of just serging or finishing the edge of the pocket pouch so its all neatly finished on the inside of the garment. I use my serger again but a zig zag stitch would also do the job.


9. Turn the pocket to its correct position so its on the wrong side of the shorts and pin the top of the pocket lining to the the top of the front short ie where the waistband will go. Also pin the side seam of the pocket to the side seam of the shorts. Make sure at this point that the pocket is laying flat.

View from right side
View from wring side

Baste that down then you are ready to construct the rest of your garment with a perfectly sewn pocket!

I hope this all made sesne, if not I am happy to answer any questions so fire away!!

Thursday, November 7, 2013

Its been a while!

Sorry its been a busy year for me. Moving house and in the process of building one. In a rental at the moment which is turning into a nightmare due to the absolutely crazy landlord. He has taken us to court to try and evict us for nothing! But that is a whole other story!

Luckily I have still managed to pull together a few new designs for my Etsy shop this summer. I am working on more and will post more details as soon as I have the photos ready!

Here is the first one. I love elegant tea length dresses that can be dressed up or just worn day to day. I used floral ivory lace for the bodice and and striking blue chiffon for the skirt. The skirt is underlined with a rayon lining and the bodice with a soft cotton. The bodice has princess seams, which creates a great fitted look.


Other designs to follow soon.


Tuesday, November 20, 2012

Boning the Bodice and Beyond

I didn't get time to take many photos of this stage but here a a few pictures and descriptions of how I proceeded with the bodice...


I decided to add three strips of boning to each side to give extra support for the bust. I used plastic encased boning. I removed all the plastic and sewed each strip of boning to the bodice by sewing a straight stitch either side of the channel for the plastic.

TIP: To smooth the tips of the plastic melt both ends with a lighter or match to remove any rough bits.


Then I just put the plastic back through the channels of the casing and sewed both ends down to stop any boning sliding out. Here is the finished bodice with boning.


I have noticed with a lot of strapless design that they leave you very flat chested because of the tight fitted structure, so to try and combat this I added a piece of elastic as sort of under wire to the bottom of the bust area. My hope was that this would pull in this area giving a more shapely look - worth a try. I pulled the elastic so it had a bit of a stretch between each piece of boning but not too much for it to ruffle the muslin. I sewed it to the boning and will attach it later to the zip along the center back seam. 

Close up of the elastic 'underwire' sewed to the boning just below the padded bra


Now all that was left to do was cut out the linings and satin bodice and sew it all together! Simple right! I forgot to take any pictures until right at the end so sorry about that. Hope you get the general idea though of how it fits together.

I used two different linings one in china silk and the other a cotton blend. The china silk was for inbetween the satin and the underconstruction so nothing showed through and the cotton lining was to make a nice finish on the inside of the bodice. Sorry about the photo I was doing this at night so the light was rubbish.

From top layer to botton: Satin - china silk - underconstruction - cotton blend lining

I like to do things in stages so I sewed each the satin to its lining and then the underconstruction to its lining.


Underconstruction to lining
Then I just sewed both layers together to make the final bodice.


The final thing to do was to sew twill tape to the seam pulling it a little tighter than the length of the actual seam. This makes sure that the top of the bodice stays hugged in as much as possible. I trimmed all the seam allowances and understitched as far as possible to make sure the lining stayed in place.


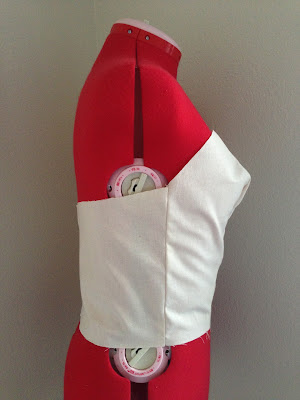
Here is the finished bodice on the dress form.


And drum roll please........

the final dress is finished with the skirt sewed on. Phew that was a lot of work! I hope you all like it!


And thats it another item for my Etsy shop ready to go. I will be taking photos of the dress this week to put on my shop so stay tuned for that. Any thoughts or comments are very welcome.

Monday, November 5, 2012

The Case of the Pointy Bust!

I've been working away on the strapless bodice and have finally got the under-construction pretty much complete. I need my husband to come home from work (later as per) to help me fit then all should be done. So here is a quick demo/tutorial on how I went about making the bodice.

Following on from my last post here is the put together bodice made from muslin.


Surprisingly the fit actually was pretty good apart from the massive pointy bust area of course! Pretty good going for my first attempt. How to fix the problem...

1. I pinned the excess fabric along the princess seam so it gave a much better fit.


 2. Remove the bodice from the dress form and then mark with chalk along the line of the pins so when you take them out you can see how much material you want to lose.


3. Unpick the seam and cut away the excess fabric remembering to leave a seam allowance mine was 3/8".

Unpicked sides with chalk marks.
Cut away excess leaving 3/8" seam allowance

4. If your not planning on using your pattern again them you can skip this step. If you are then it is important to make the same the same adjustment you made on the muslin to the pattern so you won't have the same pointy bust problem the next time!

I cut away the same size piece as I did on the muslin
5. The fun part! Sew the bodice back together to see if it worked out! The adjustments I made worked out great. I was too lazy to iron the seams which would have made them smoother. Slap wrists for me!


One finished and fitted bodice! Starts to get a little more tricky from here and in the next few posts I will be going into details about how I make the structured bodice including boning, making padded cups and other such fun things!

I hope you find this tutorial helpful and as always all comments and questions are very welcome.

Happy sewing!

Tuesday, October 9, 2012

On With The Satin Goddess

Finally I have had the time to make the pattern for the Satin Flower Dress! This dress will be one of the most complicated designs I have attempted yet. It has the scary strapless element that needs to somehow defy gravity! What I really do not want is a dress that you have to constantly keep pulling up - no-one wants to wear that! This means that the bodice needs to be very well constructed and fitted to make sure it stays in place.

How am I going to do this you may ask... well the answer is I haven't fully figured that out yet! Its a working progress. What I do know is that I will be using boning for the first time and I will be adding extra support at the bust so it can be worn without a bra. I haven't quite figured out how I am going to do that yet but I'm sure it will all work itself out in the end!

First things first - the pattern. That I can do! To draft the pattern I used the following book, which I do use for most of my pattern construction. Its a great book with excellent and clear instructions on a whole host of designs and garments. Perfect for teaching yourself pattern making - which is what I have used it for.


I made the pattern for a Strapless Princess Bodice which is essentially just adapted from the simple sloper with a few alterations for contouring. I actually forgot to take any pictures of me making the pattern (sorry!), but here is the finished article.


Front pieces for the princess seam. 


Yes I know this is upside down! For some reason every time I try to import into the blog it flips, hopefully you get the general idea. Its not a very exciting pattern piece anyway.

With my pattern finally done I was on a roll and decided to go ahead and test it out on some muslin. So here is it all cut out and ready to sew together.


Look at me being all productive! Next step is to sew this together and if all has gone to plan, which of course it very rarely does, the bodice should fit perfectly! If not stay tuned for some potentially very tricky fitting problems and see how I go about fixing them.

All comments and questions welcome!

Monday, June 18, 2012

1940's Dress Complete

After a lot of ups and downs I finally got the dress competed in time for the ball. I was literally hemming it a few hours before we had to leave! Nothing like stressing yourself out with massive time restraints! Here are a few photos of my husband Chris and I at the ball.

Standing in front of a WWII plane

Front of the dress

Another plane!

Back of the dress

V-neck!

Chris and I on a plane wing

Back of my hair

The WWII ball was so much fun, Chris and I had a blast. Got to do lots of swing dancing and saw lots of cool retro shows. It really did feel like we had stepped back in time - a magical night and I can't wait until next year already!

Have you been to anything similar? What did you think of the dress? Comment away! 


Related Posts Plugin for WordPress, Blogger...