Let me know what you guys think. As always comments are very welcome!
This blog will explore how I create fashion designs for my Etsy shop. I will go into detail about sewing techniques, pattern making and how I come up with ideas. The blog will also include other bits and pieces from my life, such as pets, dancing and running a business. Please feel free to comment on any of my posts, I would love to know your thoughts.
Showing posts with label wedding. Show all posts
Showing posts with label wedding. Show all posts
Monday, November 11, 2013
Ivory and Lace
On to my next design. This dress has a princess seam bodice and a half circle skirt. The whole dress is overlayed with an ivory flower lace. The main fabric is a cotton and polyester blend, which has the benefit of not wrinkling and is the perfect weight for this design. I have lined the dress with a rayon bemberg lining that breathes beautifully and feel soft against the skin.
Let me know what you guys think. As always comments are very welcome!

Let me know what you guys think. As always comments are very welcome!
Labels:
Arts,
Bodice,
bridesmaids,
circle,
Clothing,
Crafts,
dress,
Etsy,
handmade. circle skirt,
ivory,
lace,
Princess seams,
sew,
sewing,
Shopping,
v neck,
wedding
Monday, November 5, 2012
The Case of the Pointy Bust!
I've been working away on the strapless bodice and have finally got the under-construction pretty much complete. I need my husband to come home from work (later as per) to help me fit then all should be done. So here is a quick demo/tutorial on how I went about making the bodice.
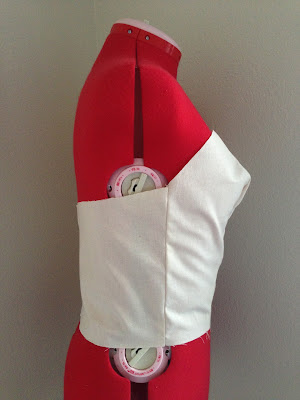
Following on from my last post here is the put together bodice made from muslin.
Surprisingly the fit actually was pretty good apart from the massive pointy bust area of course! Pretty good going for my first attempt. How to fix the problem...
1. I pinned the excess fabric along the princess seam so it gave a much better fit.
2. Remove the bodice from the dress form and then mark with chalk along the line of the pins so when you take them out you can see how much material you want to lose.
3. Unpick the seam and cut away the excess fabric remembering to leave a seam allowance mine was 3/8".
4. If your not planning on using your pattern again them you can skip this step. If you are then it is important to make the same the same adjustment you made on the muslin to the pattern so you won't have the same pointy bust problem the next time!
5. The fun part! Sew the bodice back together to see if it worked out! The adjustments I made worked out great. I was too lazy to iron the seams which would have made them smoother. Slap wrists for me!
One finished and fitted bodice! Starts to get a little more tricky from here and in the next few posts I will be going into details about how I make the structured bodice including boning, making padded cups and other such fun things!
I hope you find this tutorial helpful and as always all comments and questions are very welcome.
Happy sewing!
Following on from my last post here is the put together bodice made from muslin.
Surprisingly the fit actually was pretty good apart from the massive pointy bust area of course! Pretty good going for my first attempt. How to fix the problem...
1. I pinned the excess fabric along the princess seam so it gave a much better fit.
2. Remove the bodice from the dress form and then mark with chalk along the line of the pins so when you take them out you can see how much material you want to lose.
3. Unpick the seam and cut away the excess fabric remembering to leave a seam allowance mine was 3/8".
 |
| Unpicked sides with chalk marks. |
 |
| Cut away excess leaving 3/8" seam allowance |
4. If your not planning on using your pattern again them you can skip this step. If you are then it is important to make the same the same adjustment you made on the muslin to the pattern so you won't have the same pointy bust problem the next time!
 |
| I cut away the same size piece as I did on the muslin |
One finished and fitted bodice! Starts to get a little more tricky from here and in the next few posts I will be going into details about how I make the structured bodice including boning, making padded cups and other such fun things!
I hope you find this tutorial helpful and as always all comments and questions are very welcome.
Happy sewing!
Subscribe to:
Posts (Atom)


